For building you need to uncomment and comment a lot of files. Let's start in parts
default = ["mcu-esp32c3", "imu-stubbed", "log-rtt", "net-wifi"]
# default = ["mcu-nrf52840", "imu-stubbed", "log-usb-serial", "net-stubbed"]
# default = ["mcu-esp32", "imu-stubbed", "log-uart", "net-wifi"]
You need to uncomment the one you want to use, then comment the one that wasn't. In this case, we are gonna use mcu-esp32c3.
We will change the imu-stubbed to a supported one which are the following:
imu-bmi160imu-mpu6050(Compatible with other MPUs but only 6-DoF)
The log and net can be leaved as it is for now.
target = "riscv32imc-unknown-none-elf"
# target = "thumbv7em-none-eabihf"
# target = "xtensa-esp32-none-elf"
The following table shows the appropiate target for the mcu:
target |
Compatible mcu |
|---|---|
riscv32imc-unknown-none-elf |
mcu-esp32c3 |
thumbv7em-none-eabihf |
mcu-nrf52840, mcu-nrf52832 |
xtensa-esp32-none-elf |
mcu-esp32 |
[env]
# You can override this via environment variable when building or by changing it here
DEFMT_LOG = "debug"

# Change to your wifi's or override with environment variables.
SSID = "ssid"
PASSWORD = "password"
Each variable configures how the code will work, follow this table for description on each one:
[env] variables |
Description |
|---|---|
DEFMT_LOG |
There is an explanation on defmt's docs but you should probably use debug or trace for development and info for normal usage |
SSID |
The name of your Wi-Fi, only needed when using the net-wifi feature |
PASSWORD |
The password of your Wi-Fi, same as above |
SDA_PIN |
Pin used in your board for SDA on your IMU |
SCL_PIN |
Pin used in your board for SCL on your IMU |
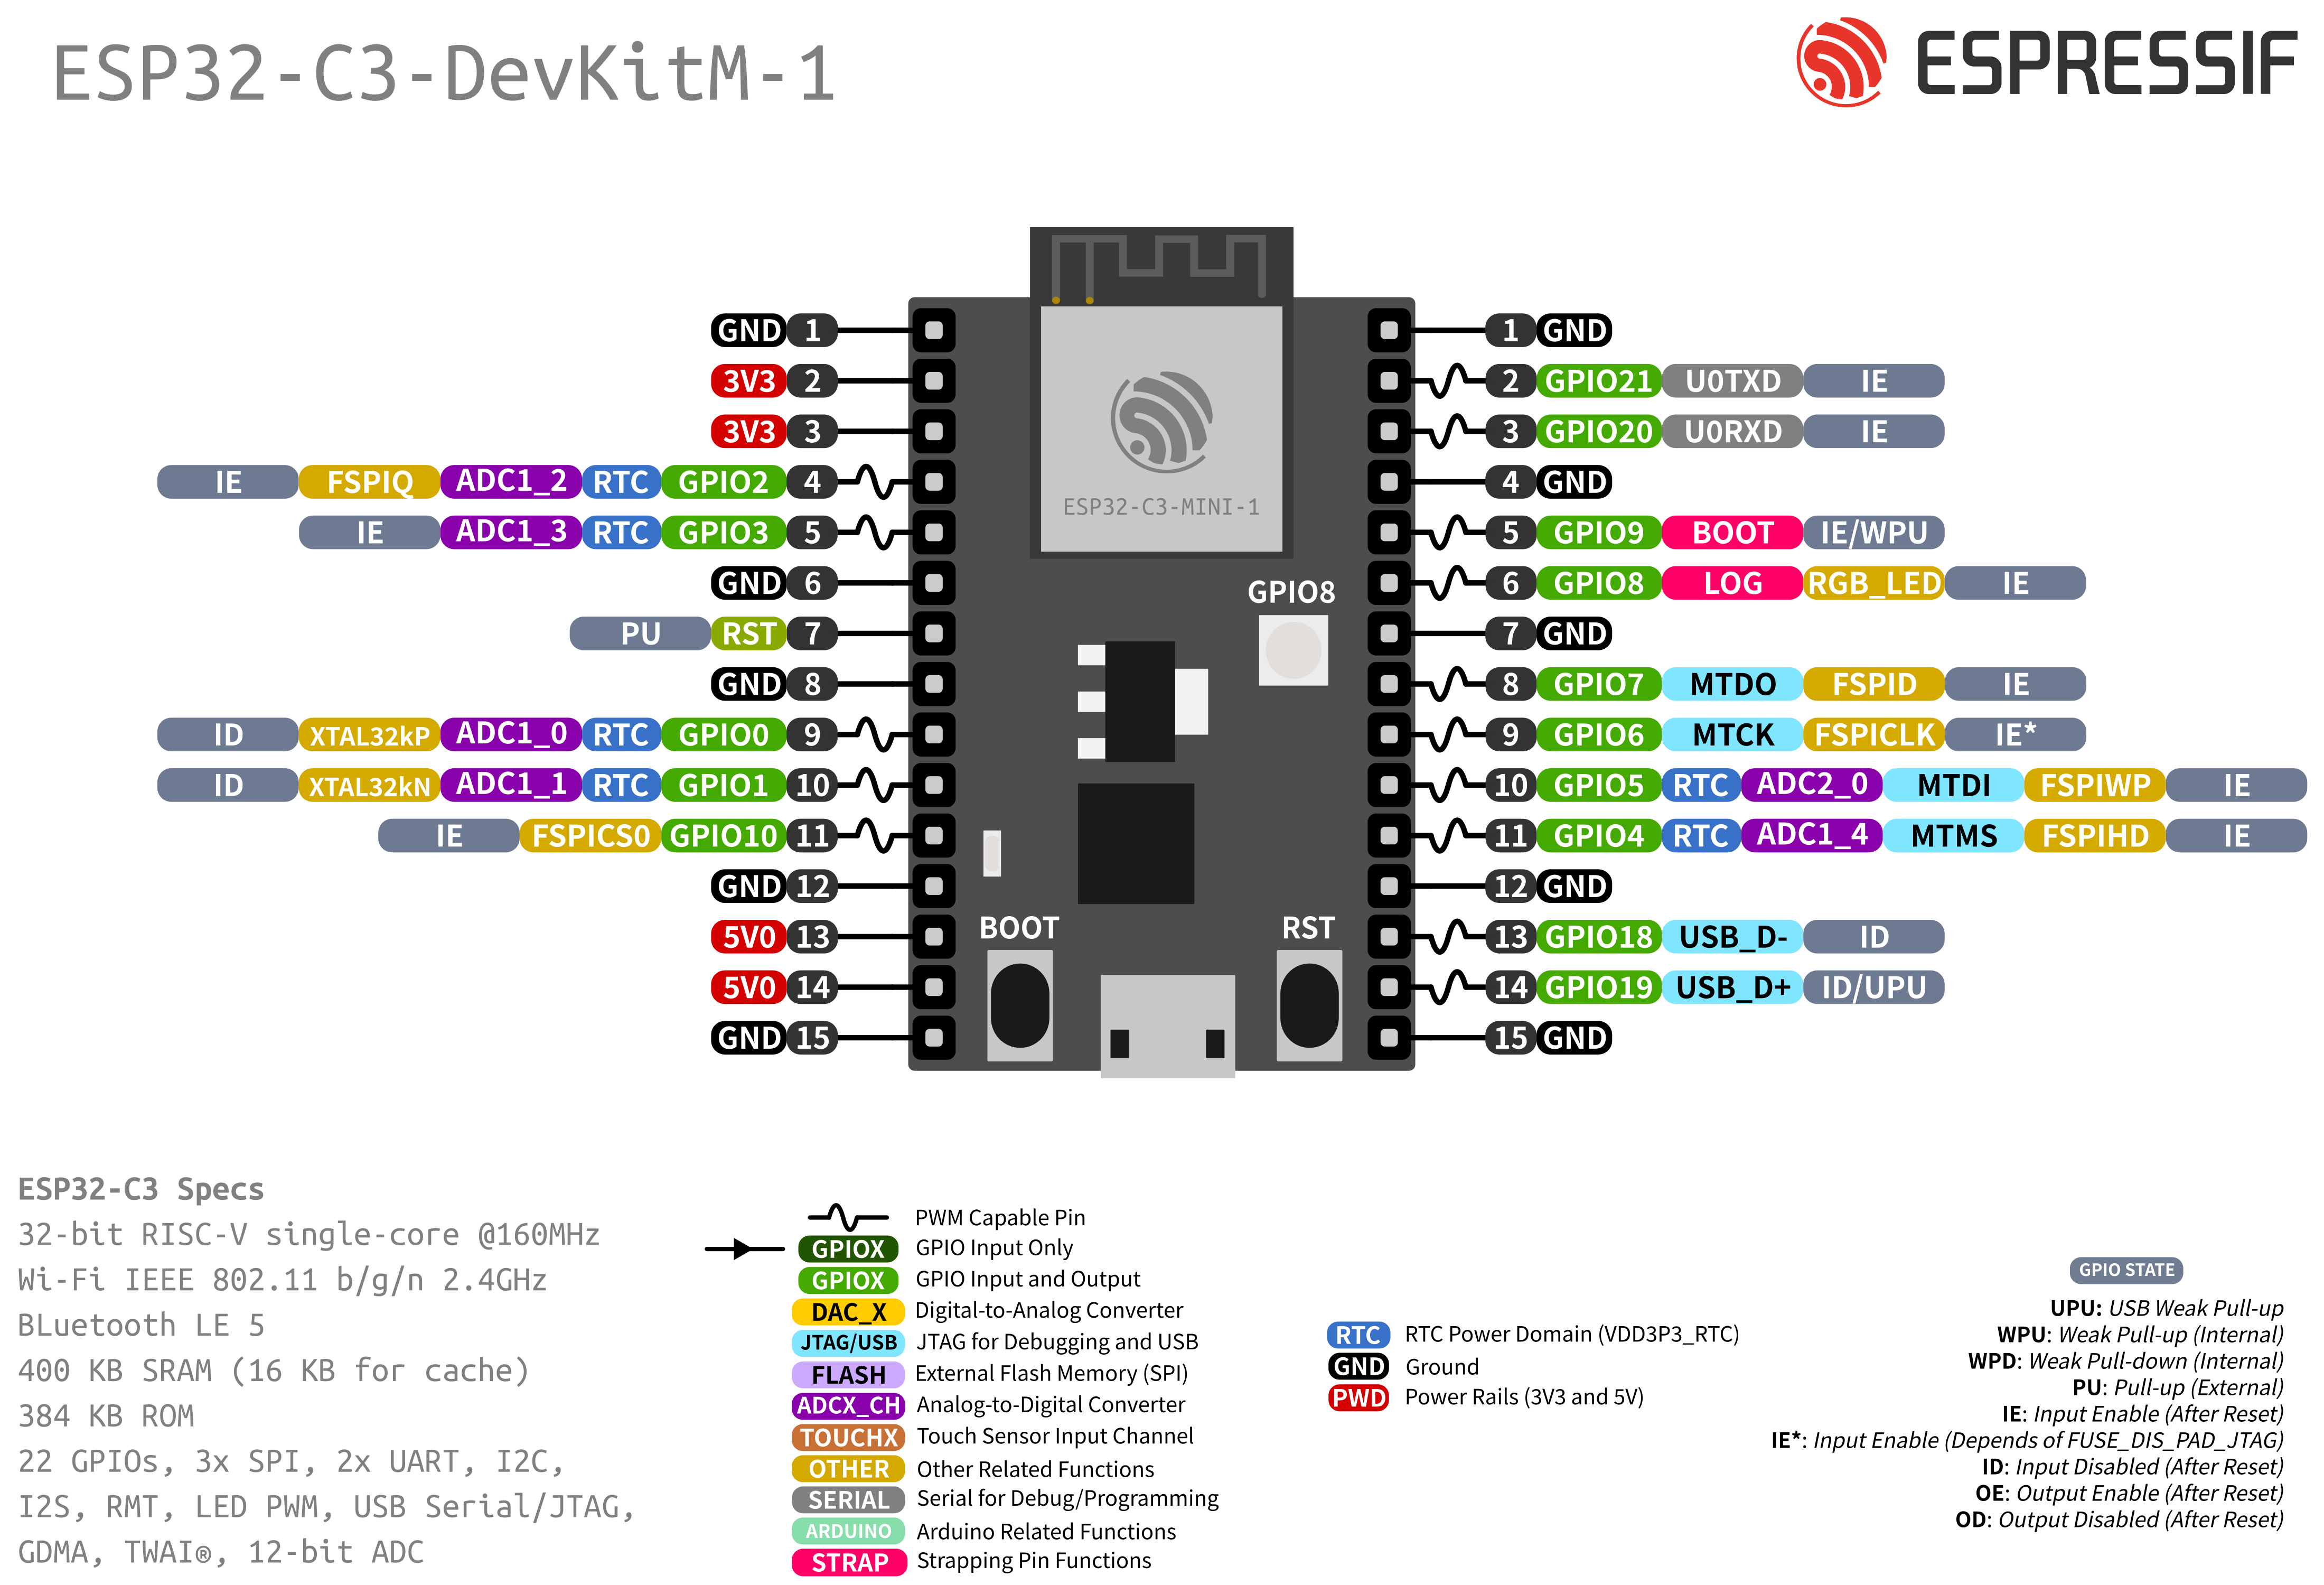
Use the following table on how the pins should be formatted for env variables:
| Board family | Pinout format |
|---|---|
| nRF52 boards | It uses the GPIO pins (example in light yellow), which are demarked as P0.11, you only need to write the numbers so 0.11 but instead of . use _ |
| ESP32 boards | It uses the GPIO pins (example in light green), which are demarked as GPIO9, you only need to write the numbers so just 9 in this case |

You need to edit rust-toolchain.toml:
channel = "nightly-2022-12-18"
# channel = "esp" # for when compiling to xtensa targets
Just uncomment the "esp" channel and comment the other one. You also need to install the toolchain itself which there is a guide in here for.
Ok, this part is hellish. You need to know what you are doing if you select a complicated method or use a weird board because, maybe you will have missing drivers (Windows 👀), or maybe if using a probe it's not working correctly, or you just did the pinout wrong, or just the board hates you.
But this guide's objective is to try to help you and if you manage to do something that wasn't easy or explained you can pull request it to here, so you can help people and don't make them suffer like you did!
| Method | Compatible devices |
|---|---|
| USB-JTAG (very easy) | mcu-esp32c3 |
espflash (very easy) |
All ESP32 devices with the default ESP first-stage bootloader |
nrfdfu (easy) |
All nRF devices with a DFU bootloader |
probe-rs (normal) |
Any device with SWD or JTAG |
You will need to install cargo-embed, so do cargo install cargo-embed and plug your device through USB.
After installing it you can just do cargo embed and maybe it will ask you which device it should flash, you choose your device, and it will flash it. After that it will start monitoring the device but you can just Ctrl+C it.
With that all done, you have your device flashed!
You will need to install cargo-espflash, so do cargo install cargo-espflash --version "2.0.0-rc.2" and plug your device through USB.
After installing it you can just do cargo espflash flash and maybe it will tell you that it requires specifying the device, so you specify one. It will flash it, and you are done!
You first need a probe, we mostly use a Raspberry Pi Pico with picoprobe. Then you need to connect the probe pins to the appropiate pins of your board (you will need to google that).
You will have to configure the Embed.toml to the appropiate settings of the device you want to flash, usually the protocol and chip variables are the one needing change.
Install cargo-embed, so do cargo install cargo-embed and plug your probe to your PC.
After having everything, just do cargo embed and it should just work!
Install nrfdfu, you do that with cargo install nrfdfu. Then connect your nRF through USB.
After installing you will need to cargo build and then do nrfdfu target/thumbv7em-none-eabihf/debug/firmware (it can be release instead of debug if you are building with the release profile). It will flash your nRF and you are done!