In this tutorial, we are attempting to control the grandMA3 using the python-osc messaging protocol.
The resources in this tutorial are tested with the following hardware and software:
- Computer running grandMA3 onPC
- grandMA3 onPC 2Port Node 2K
- Python 3.9 or higher
For more information on OSC for grandMA3, please refer to the official documentation.
Before running any Python script, you must configure the grandMA3 onPC software to receive OSC commands.
Please refer to the setup guide (file: GrandMA3_OSC_setupguide.pdf) for step-by-step instructions, including:
- Configuring the 2Port Node hardware network settings
- Inviting the node in grandMA3 onPC Network
- Configuring sACN / DMX Protocols
- Patching fixtures
- Creating sequences and cues
- Enabling OSC In & Out settings (Step 6 in the setup guide)
Key OSC settings to verify in grandMA3 (Menu > In & Out > OSC):
- Destination IP: set to the IP address of the computer sending OSC
- Port:
8000- Prefix:
gma3- Receive:
Yes- Receive Command:
Yes- Echo Input:
Yes
In this example, a Raspberry Pi sends OSC commands to grandMA3 onPC running on a separate computer, connected via a network switch.
graph LR
A[Python 3.9<br>Computer or Raspberry Pi] <--LAN--> B[Network Switch]
B <--LAN--> C[grandMA3 onPC<br>use this IP Address]
B <--LAN--> D[grandMA3 2Port Node 2K]
| File | Purpose |
|---|---|
grandma.py |
Python script that sends a sequence trigger command via OSC |
- Create a folder for the project files
mkdir grandma
- Copy the Python script into the folder
~/grandma
grandma.py
- Open
grandma.pyand edit the IP Address and Port Number at lines 18 and 19 to match the computer running grandMA3 onPC
LAPTOP_IP = "192.168.0.100"    # IP address of the computer running grandMA3
PORT = 8000 # OSC input port set in grandMA3- Install the required Python library
pip install python-osc
- Run the script. If successful, Sequence 1 will be triggered in grandMA3
python3 grandma.py
grandma.py sends a single OSC message to the address /gma3/cmd with the command "Go Sequence 1". This is the simplest form of OSC control, useful for triggering pre-programmed cues from an external device.
This section is based on the work contributed by Syakil Toriman (from Diploma in Infocomm Media & Engineering, Nanyang Polytechnic), 2025.
In this example, Visual Studio Code on the same Windows PC as grandMA3 onPC sends OSC commands using the loopback address. This approach does not require a network switch or a Raspberry Pi, and extends control to individual fixture attributes such as Pan and Tilt.
Original repository: syak-OSC
graph LR
A[Visual Studio Code] --Python-osc / Loopback 127.0.0.1--> B[grandMA3 OnPC]
| File | Purpose |
|---|---|
GMA3_OSC.py |
Python script that controls fixture Pan and Tilt attributes via OSC |
OSC_Project_2025S1.show |
grandMA3 show file with fixtures pre-patched and OSC configured |
LoadShow.md |
Instructions for loading the show file into grandMA3 onPC (Windows) |
-
Load the show file
OSC_Project_2025S1.showinto grandMA3 onPC. Refer toLoadShow.mdfor instructions on how to place the.showfile in the correct Windows directory and load it from within grandMA3. -
Once the show file is loaded, configure the In & Out settings. Navigate to Menu > In & Out > OSC and verify the following:
- Port:
8000 - Prefix:
/gma3/cmd - Receive Command:
Yes
Refer to the images below for guidance:

- Port:

-
Copy
GMA3_OSC.pyinto your project folder and open it in VS Code -
Confirm that Python is installed. Run the following in the VS Code Terminal:
py --version
If a version number appears (e.g. Python 3.x.x), Python is installed. If not, install Python before continuing.
- Install the required Python library:
py -m pip install python-osc
Run the script from the VS Code Terminal:
py GMA3_OSC.py
If successful, you will see feedback in the grandMA3 System Monitor and the fixture attributes will update accordingly.

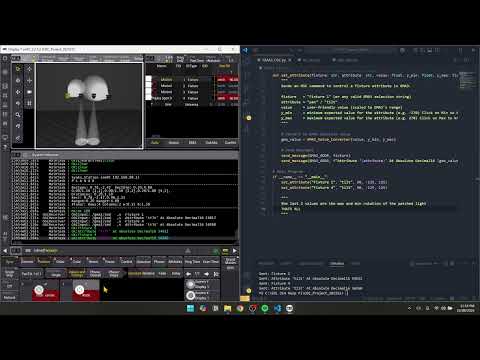
GMA3_OSC.py sends OSC commands to control Pan and Tilt attributes on specific fixtures. It uses a value converter function to translate human-readable degree values (e.g. 45 degrees) into the 0–65535 integer range that grandMA3 expects via its Absolute Decimal16 command.
The key function is set_attribute():
set_attribute("Fixture 1", "pan", 45, -315, 315)
#              fixture      attribute  value  min   max
The last two values (-315 and 315) are the physical rotation limits of the patched fixture. These vary by fixture model, so check the fixture's attribute min/max in grandMA3 before editing them.
Note on IP address:
GMA3_OSC.pyuses the loopback address127.0.0.1because grandMA3 and VS Code are running on the same machine. If you want to send from a separate device (as in Part A), changeGMA3_IPto the IP address of the grandMA3 computer.
| Part A (Raspberry Pi / LAN) | Part B (VS Code / Same PC) | |
|---|---|---|
| Hardware needed | Raspberry Pi or separate computer, network switch | Windows PC only |
| Connection | LAN (separate IP addresses) | Loopback (127.0.0.1) |
| What gets controlled | Sequences (cue triggering) | Fixture attributes (Pan, Tilt) |
| Script | grandma.py |
GMA3_OSC.py |
| OS | Linux / macOS / Windows | Windows |
| Run command | python3 grandma.py |
py GMA3_OSC.py |
Click the image above to watch the Part B demonstration video.