UniCAVE 2018 Scripts Documentation
- Network Initialization
- UC Network
- Head Configuration
- VRPN Track
- Physical Display
- Physical Display Manager
- Basic Custom Setup
This script automatically starts a server or tries to connect to the server, depending on whether the machine Unity is running on matches the Head Machine option. There are script variables for the server IP (which should be the LAN IP of the head node) and port, both of which can be overridden with command line options:
Command Line Options:
| Parameter | Script Name | Description | Example |
|---|---|---|---|
| serverAddress | ServerAddress |
The IP address the server runs on, and that the child nodes will attempt to connect to | 192.168.1.115 |
| serverPort | Port |
Server port | 7568 |
| forceClient | N/A | Whether or not to force this instance to run as a client, regardless of machine name (useful for running client and server instances on head machine) | 1 |
This script needs a reference to a NetworkManager, which is Unity 2018’s built in method of managing client server connections. Make sure the NetworkManager script is enabled to allow enough connections; under Network Info, Enable Advanced Configuration And Ensure Max Connections is enough to support all your child nodes.
The UCNetwork script should be attached to the root GameObject that represents your CAVE setup. You should only need one UCNetwork script per scene. This script only runs on the head node machine, and is responsible for sending update information to the child node machines. UCNetwork needs a reference to a HeadConfiguration script, so that the HeadConfiguration GameObject can be updated by the server. The GameObject with the UCNetwork script attached can be moved and reoriented throughout the Unity scene, so make sure it is the parent of your PhysicalDisplay and HeadConfiguration GameObjects.
The HeadConfiguration script contains eye separation and camera parameters. You should only need one HeadConfiguration script per scene.

Whatever GameObject the VRPNTrack script is attached to will be transformed to have the position and orientation of the real life tracker. For example, if you have a VRPN tracker attached to a user’s head or glasses, you can put attach a VRPNTrack script to your head object.

For each real display in your CAVE setup, there should be one GameObject with a PhysicalDisplay script attached. The PhysicalDisplay script is designed to be extremely flexible so that it can be used on many types of CAVE setups. The PhysicalDisplay script contains most of the information about a display as it exists in the real world. Below is a labeled example of a PhysicalDisplay.
The main function of a PhysicalDisplay is to render perform the calculations necessary so that the display in the real world appears as it should. This is accomplished by changing the projection matrix of the cameras on the HeadConfiguration. However, another important function is automatically positioning the window and camera viewports on the screen, so they appear as they should. For example in a dual pipe setup, the left and right eye must appear on different areas of the display for stereo 3D to work correctly; PhysicalDisplay takes care of this automatically (and is configured with the Window Rect, Left Viewport, and Right Viewport options).
 ]
]
| Label | Name | Description |
|---|---|---|
| (A) | Manager | Reference to physical display manager; used for running multiple physical displays in one instance of Unity |
| (B) | Machine Name | Which machine to run this physical display on |
| (C) | Activate All Displays | Enable exclusive fullscreen on multiple displays* |
| (D) | Physical Width | The width of the display in real life (normally in meters) |
| (E) | Physical Height | The height of the display in real life (normally in meters) |
| (F) | Head | Reference to the HeadConfiguration script used in the CAVE setup |
| (G) | Use XR Cameras | When rendering in active stereo mode, use Unity’s default XR cameras** |
| (H) | Use Render Textures | Render to textures instead of screen, which can be used for post processing effects |
| (I) | Exclusive Fullscreen | Whether this program should run in exclusive fullscreen mode |
| (J) | Is 3D | Is this CAVE setup outputting any type of stereo 3D image? |
| (K) | Dual Pipe | Is this program a dual pipe stereo setup as opposed to a active stereo setup |
| (L) | Dual Instance | (If Dual Pipe Enabled) Should each eye render in a separate instance of Unity |
| (M) | Window Rect | The bounds where the window should exist on the screen |
| (N) | Left Viewport | (If Dual Pipe Enabled) The bounds where the left eye should render on the screen |
| (O) | Right Viewport | (If Dual Pipe Enabled) The bounds where the right eye should render on the screen |
*As of 11-2-2018, does not work with OpenGL
**Requires making changes to Unity player settings
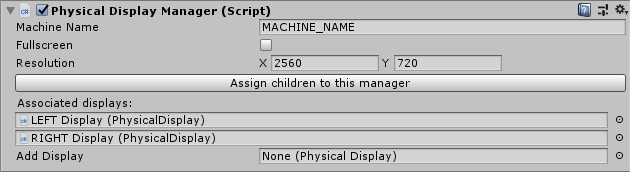
The PhysicalDisplayManager script allows multiple PhysicalDisplay objects to exist within one instance of Unity. For example, if your CAVE setup consists of three displays connected to one machine, your Unity scene would have three PhysicalDisplay objects. Ordinarily one would need to launch three instances of Unity to manage these three displays (this technique can be used for Multi-GPU setups to run each instance of Unity on a different GPU). If these PhysicalDisplay objects are attached to a PhysicalDisplayManager, only one instance of Unity can run which will control all three displays.
A good example implementation of PhysicalDisplayManager can be found in the DualMonitorOneMachine sample under Prefabs/Basic, in UniCAVE2019.

A basic setup consists of four parts:

- A GameObject with Network Manager script and Network Initialization script (see below)
- A GameObject with UCNetwork script attached
- An assortment of GameObjects with PhysicalDisplay scripts attached
- A GameObject with HeadConfiguration script attached (And often a VRPNTrack script)
Parts 2-4 involve simply configuring the respective scripts as described in their sections, but Part 1 involves a few more scripts and configuration.
Object 1 in the Basic Setup:

A. Disable “Auto Create Player” on the Network Manager Script
B. Enable “Advanced Configuration”, ensure that “Max Connections” is enough for your setup
C. Configure your Network Initialization script as described
D. For debugging, it is useful to use a NetworkManagerHUD script to manually start a server or client, which is normally done by the NetworkInitialization script based on the machine name Unity is currently running on.
Additional Command Line Options:
| Parameter | Description | Valid Options | Example |
|---|---|---|---|
overrideMachineName |
Launch your application as if it was running with a certain machine name | Any string | overrideMachineName MY_HEAD_MACHINE |
appendMachineName |
Launch your application as if it was running with a string appended to its machine name (useful if you have two instances of Unity running on the same machine but want a different display for each of them) | Any string | appendMachineName _left |
eye |
Which eye a certain instance of your application should render (useful if you have one instance of Unity running per eye) |
left, center, right
|
eye right |
serverAddress |
(Valid only for NetworkInitialization scripts) What network address the server should start on or connect to | Any IPV4 | serverAddress 192.168.5.8 |
serverPort |
What network address the server should start on or connect to (Valid only for NetworkInitialization scripts) |
Any integer ∈[1,65535] | serverPort 1234 |
-screen-fullscreen |
Whether to launch the application in exclusive fullscreen mode |
0, 1
|
-screen-fullscreen 0 |
-popupWindow |
Whether to launch the application without borders | None | -popupWindow |
-show-screen-selector |
Whether to launch the screen selector window (enabled by default, can be disabled in Edit->Project Settings->Player->Resolution and Presentation->Display Resolution Dialog) | None | -show-screen-selector |
-screen-width |
Width of the window (may be overridden at runtime by PhysicalDisplay) |
Positive, nonzero integers | -screen-width 1280 |
-screen-height |
Height of the window (may be overridden at runtime by PhysicalDisplay) |
Positive, nonzero integers | -screen-width 720 |
Additional Player Settings – Enabling Active Stereo
To enable active stereo setups in Unity: go to Edit->Project Settings->Player and enable Virtual Reality Supported, add Stereo Display (non head-mounted) to the list of SDKs, and remove the other SDKs.