This backend service powers the WrtnLabs.
All project contributors must review the ERD Design Document before starting development work.
- Node.js v20+
- PostgreSQL
- pnpm
- AWS - for aws service authentication
# Clone repository
git clone https://github.com/wrtnlabs/backend wrtnlabs-backend
cd wrtnlabs-backend

# Install PostgreSQL via Docker
bash postgres.sh

# Install dependencies and build
pnpm install
pnpm run build

# Set up database
pnpm run schema     # DB schema initialization
pnpm run data:seed  # Seed data insertion
pnpm run start

curl http://localhost:3700/_health
If you contact credentials error when executing the
pnpm run schemacommand, please try this command:pnpm run schema <your_username> <your_password>
This is a SDK library generated by nestia.
To interact with WrtnLabs Backend APIs and interfaces, use the official SDK @wrtnlabs/os-api. The SDK ensures secure API communication and provides interface definitions directly in the code.
If you use this SDK, please read this document: packages/api/README.md
- Provides typed API communication with DTO structures.
- Eliminates the need for manual API documentation lookup.
- Enables safe and convenient interaction for frontend developers.
- Developers can use predefined interfaces and asynchronous functions without manually redefining API structures.
- More efficient and user-friendly compared to traditional REST API solutions.
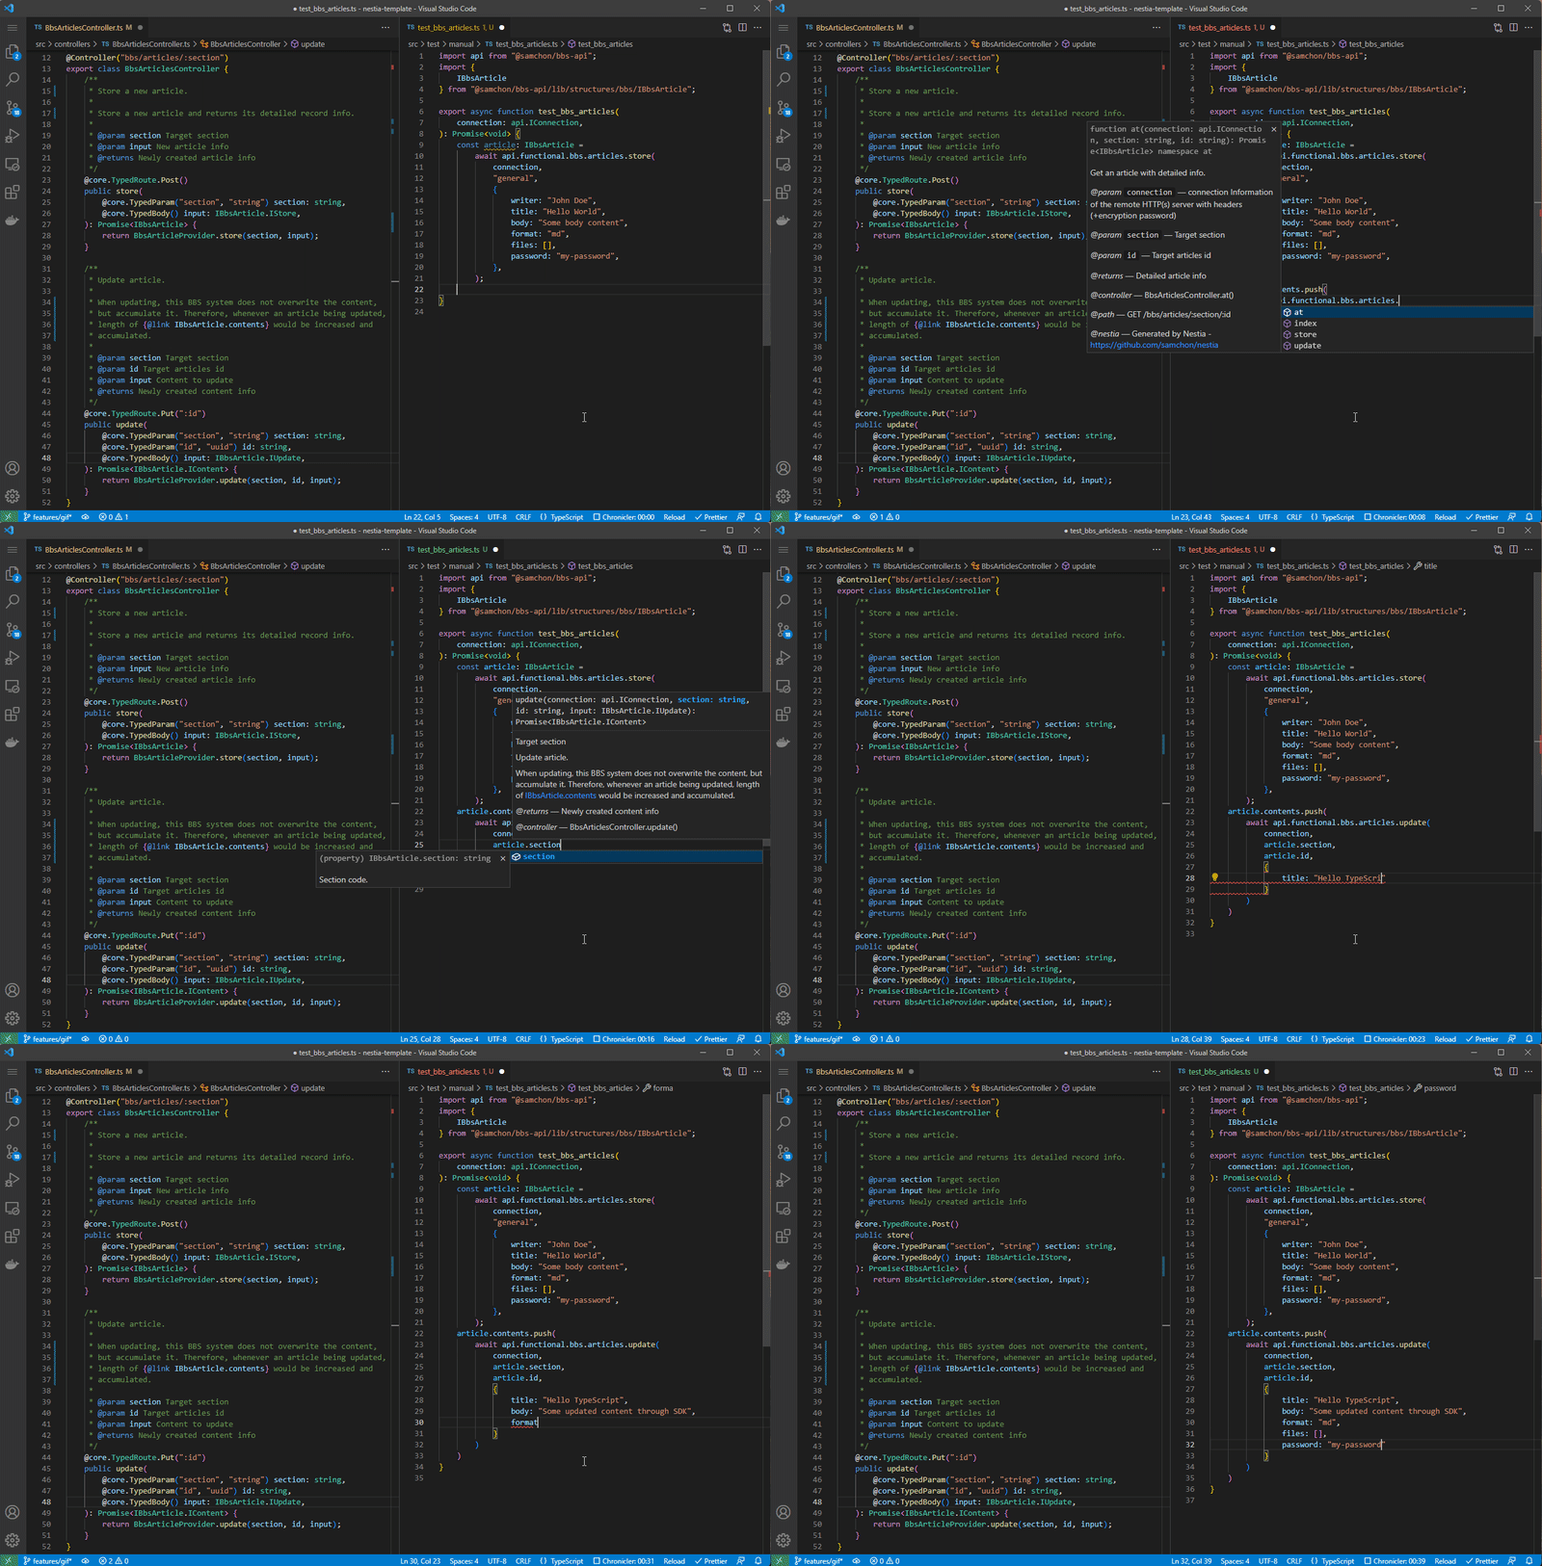
When the SDK has been published, client programmers can interact with this backend server very easily. Just let them to install the SDK and call the SDK functions with the await symbol like below.
Left is server code, and right is client code utilizing the SDK
If you want to add a new feature or update ordinary thing in the API level, you should write the code down to the matched API controller, who is stored in the src/controllers directory as the Main Program.
However, Wrtnlabs does not recommend to writing code down into the Main Program first, without any consideration. Instead, Wrtnlabs recommends to declare the definition first and implement the Main Program later.
Therefore, if you want to add a new feature in the API level, define the matched data entity in the prisma and src/api/structures directories. After the data entity definition, declare function header in the matched API controller class in the src/controllers. Note that, it's only the declaration, header only, not meaning to implement the function body.
After those declarations, build the client SDK through the pnpm run build:api command and implement the Test Automation Program using the SDK with use case scenarios. Development of the Main Program should be started after those preparations are all being ready. Of course, the Main Program can be verified with the pre-developed Test Automation Program in everytime.
- Declare data entity (
prismaschema file) - Design API function types, without main program implementation
- Build the client SDK
- Implement the Test Automation Program
- Develop the Main Program
- Validate the Main Program through the Test Automation Program
- Deploy to the Dev and Real servers.
TDD (Test Driven Development) with SDK
After the Definition and client SDK generation, you've to design the use-case scenario and implement a test automation program who represents the use-case scenario and guarantees the Main Program.
To add a new test function in the Test Automation Program, create a new TS file under the test/features directory following the below category and implement the test scenario function with representative function name and export symbol. I think many all of the ordinary files wrote in the test/features directory would be good sample for you. Therefore, I will not describe how the make the test function detaily.
Anyway, you've to remind that, the Test Automation Program resets the DB schema whenever being run. Therefore, you've to be careful if import data has been stored in the local (or dev) DB server. To avoid the resetting the DB, configure the skipReset option like below.
Also, the Test Automation Program runs all of the test functions placed into the test/features directory. However, those full testing may consume too much time. Therefore, if you want to reduce the testing time by specializing some test functions, use the include option like below.
include: test only restricted functions who is containing the special keyword.exclude: exclude some functions who is containing the special keyword.reset: do not reset the DB
# test without db reset
pnpm run test --reset false

# include or exclude some features
pnpm run test --include something
pnpm run test --include cart order issue
pnpm run test --include cart order issue --exclude index deposit

# run performance benchmark program
pnpm run benchmark
For reference, if you run pnpm run benchmark command, your test functions defined in the test/features/api directory would be utilized for performance benchmarking. If you want to see the performance bench result earlier, visit below link please:
After Definition, client SDK building and Test Automation Program are all prepared, finally you can develop the Main Program. Also, when you've completed the Main Program implementation, it would better to validate the implementation through the pre-built SDK and Test Automation Program.
However, do not commit a mistake that writing source codes only in the controller classes. The API Controller must have a role that only intermediation. The main source code should be write down separately following the directory categorizing. For example, source code about DB I/O should be written into the src/providers directory.
test: Run test program (requires priorbuild:testordev)benchmark: Run performance benchmark program
build: Build SDK, test, and main programsbuild:sdk: Build SDK library (local only)build:test: Build test programbuild:main: Build main programdev: Incremental builder for test programeslint: Run ESLintprettier: Apply Prettier formatting
schema: Automatic local DB schema generatorstart: Run backend server standalonestart:mutex: Run mutex server standalonestart:proxy: Run proxy server standalonestart:swagger: Run backend swagger viewer
data:seed: Seed data insertiondata:view: Refresh view data
.vscode/launch.json: Debugging configurationpackages/: NPM modules to publishpackages/api/: Client SDK library
docs/: Documentation (ERD, etc.)prisma: Prisma Schema Filessrc/: TypeScript source codesrc/api/: Client SDKsrc/api/structures/: DTO structures
src/controllers/: Controller classessrc/providers/: Service providerssrc/executable/: Executable programs
test/: Test Automation Program

